NOTE: Some Community websites use a different Slideshow plugin in which case these instructions would not apply (send an email for help in that case).
Note that images for the slideshow should have the correct “Aspect ratio” (ratio of width to height). Your photos may need to be adjusted in Photoshop (or online: see below) to make them work properly in the slideshow (see instructions below).
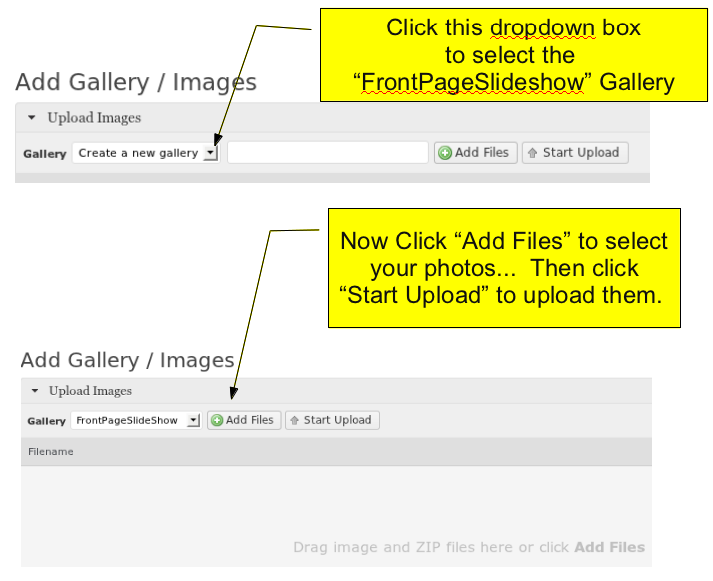
You can add photos to the front page “Slideshow”:
- Go to: >Dashboard>Gallery>AddGallery/Images>”Upload Images”>
- In the drop-down box be sure to select “FrontPageSlideshow” to associate the image with the slideshow on the front page of your website. Then when you click “Add Files”, a dialog box will come up allowing you to browse to the directory on your computer and select the image(s) to upload into the gallery.
- Note that newer versions of wordpress have a slightly different interface; there is a “Choose file” button. But it’s the same principle; you are adding images to the “FrontPageSlideshow”. Note also that if you see a button labeled “Disable Flash Based Upload”, you may need to click that button to disable flash based upload.
Click the image above to enlarge it and make it more readable.
The image will now show in the slideshow. You can also go to “>Gallery>ManageGallery” to manage the images uploaded to the “FrontPageSlideshow” gallery.
Note that there’s an online tool that can be used to easily size your images. That tool is “Pixlr” (http://www.pixlr.com). See the short instructional video on how to resize images for your slideshow using pixlr.
If you happen to be a Photoshop user, you might find these instructions to be useful:
Instructions for fixing aspect ratio of photos in photoshop (Based on Photoshop Elements 6.0):
Your photo needs to fit inside a rectangle measuring 300 x 260 pixels.
- Open the photo in Photoshop. You may want to save it immediately to a new filename so as to avoid overwriting the original file.
- Now select “>Image>Resize>ImageSize>” and you will see a dialog box showing the image size in pixels. First make sure that the “Constrain Proportions” checkbox is checked. Then you need to change either the width or the height of the image (not both – the other dimension will change automatically) so just change either the width to 300 or the height to 260 pixels. If the other dimension (the one you didn’t change) is still too big then change that one and you’ll be okay.
- Now you need to simply change the size of the “Canvas” (or background; make sure the background color is set to white) that the image is on. Do this by going to >Image>Resize>CanvasSize>. If the units of the dimensions are not showing in Pixels, click the drop-down box to select “pixels”. Then enter 300 for width and 260 for height and click “OK”. The image is now ready.
If you are using “Gimp” (open-source image editing software):
- Resize the width of the image to 300.
- Add a new white layer 300 x 260 pixels (>Layer>NewLayer> and set the color to white and the size to 300×260). NOw use the layer control to move the new layer to the back and the positioning tool to position the new image in the center of the white background.